The Diary of a Displaced Housewife is now Life In Fuchsia…


'The Diary of the Displaced Housewife' is now 'Life in Fuschia'

Showing posts with label Appetizers. Show all posts

Saturday, July 2, 2011

Finally the MEC: Party Appetizers Round Up! Here it comes….


Alas… all good things must come to an end! Hosting June’s MEC event has been a pleasure and I am truly amazed at all the creativity coming my way from my amazing fellow bloggers and even non-bloggers! I thank Srivalli of Cooking for All Seasons for this wonderful opportunity to host MEC.

The recipes in the round up are perfect for the quick wow factor in minutes without compromising on taste. Here is the round up:

The ever creative super-cook Srivalli of Spicing Your Life sent in the cheesy goodness that are her Cheese Toast with Thyme, Red Chili Flakes and Roasted Onions.


 Not being part of the blogging world did not stop Rathna S Rao and Sireesha Yetchina (enterprising cooks!) from sending in their yummy party-perfect’ spiced nuts!


Priya from the amazing blog Priya's Easy N Tasty Recipes sent us an innovative microwave version of Tandoori Baby corn!


 Denny from Oh Taste and See sent an irresistible Easy Cheesy Spinach Artichoke Dip that is perfect for gatherings!


 Srivalli from Cooking For All Seasons sends in a sure to please dish Microwave Roasted Potatoes with Herbs.


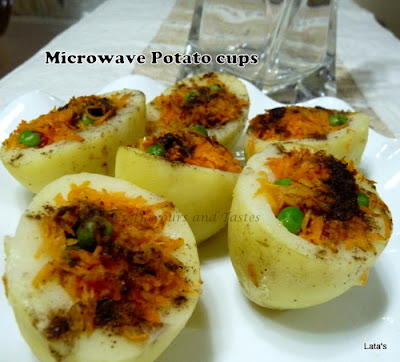
Lata Raja from Flavours and Tastes Blogspot sent in a unique recipe for creative Microwave Potato Cups.


Its Dhokla Dhamaka time at Ranjani’s blog My Kitchen Trials… simple and oh so tasty!


Vatsala from the blog Show and Tell simplifies the ever-delicious Kandavi aka Suralichi Wadi… Don’t miss it!


Monika from Sin-A-Mon created the super easy and appetizing Bread Sticks in a Jiffy: Sweet and Savory to please all tastes!


Check out The Housewife’s take on the iconic Union Square Café’s Bar Nuts at The Diary of a Displaced Housewife.


There it is! I hope I included all the entries that came my way. In case I have missed out an entry do email me and I'll ensure that I include the entry in the round up too.

Thank you all for participating in this event and looking forward to more MEC events with many many more culinary innovations! 


MEC: Party Appetizers Update - Spicy ‘Party-Perfect’ Nuts


I love this recipe from Sireesha Yetchina & Rathna Rao that is perfect for any time of the year and will surely please the fussiest of palettes! Be sure to try this at home for your next party…


Spicy ‘Party-Perfect’ Nuts


What you need:
Cashew nuts: 2 cups
Butter- 2 Tablespoons
Soy sauce - 2 Tablespoons
Chilli Powder - 1/2 Tablespoon or to taste
Parsley Flakes-1/2 Tablespoon
Garam Masala - 1 /2 Tablespoon
Pepper-1/4th Tablespoon
Cumin Powder - 1/2 Tablespoon
Garlic Powder - 1/2 Tablespoon

Getting Down to Business:
Melt butter and soy together in a small bowl (Microwave them for about 1 min) and toss with nuts.
Spread the buttered nuts on a microwavable plate and microwave them for about 5 minutes on high setting, stirring every 2 minutes.
Add the spice powders to the nuts and mix well.
Microwave the buttered and spiced nuts for about 3 minutes or until golden brown and roasted.
Set aside to cool. Transfer to a serving dish and serve as munchie.

Don’t forget to warm them up for your party!

                                                      Photograph by Yetchina

MEC Party Appetizers: Union Square Café Bar Nuts… In The Microwave!


A while back, I was watching some complete foodie heaven on the telly and saw these nuts being featured. They seemed like the perfect nibble to whip up for a group of friends. So when I had to think up of a recipe for June’s MEC event, this was my sudden flash of brillance! I altered an existing recipe by Nigella Lawson (Love love love her!). I have to admit it took a couple of tries to get this straight but it was sooo good! While its okay at room temperature, its best served all warm and toasty to bring out the amazing mix of flavors. Enjoy!


(I’ve mostly retained the original recipe’s proportions because there was no need to change it.)


Microwave Version: Union Square Café Bar Nuts

What you need:
2 1/4 cups of mixed unroasted, unsalted nuts such as almonds, cashews, peanuts.. or whatever you fancy. (I used cashews and almonds)
3 tablespoons unsalted butter
Spice Mix:
2 tablespoons coarsely chopped fresh rosemary leaves
1/2 teaspoon cayenne pepper (I used good ol’ Indian Chili powder for some mah-jor kick!)
2 ½ teaspoons dark brown sugar
2 teaspoons coarse sea salt
red pepper flakes to taste (optional)


Getting Down to Business:

Melt the butter and keep aside.
Combine the sugar, salt, rosemary, red pepper flakes, chili powder with 2 tablespoons of the melted butter and keep aside.
In a large microwave safe bowl ( I prefer glass) combine the nuts and 1 tablespoon* of the melted butter.
Microwave the nuts on high for about 4 to 6 minutes till they taste lightly roasted. Mix in the spice mix with the warm nuts ensuring they are thoroughly coated. Best served warm!

Notes:
Feel free to use regular cayenne powder to keep the heat quotient in check.
As far as possible try to use fresh rosemary for best results.
*If needed, please use more melted butter to ensure the nuts are evenly coated to help the roasting process.

Tuesday, June 21, 2011

MEC: Party Appetizers Update


Look what the lovely Srivalli from Spicing Your Life sent in for MEC: Party Appetizers.. a very yummy Cheese Toast with Thyme, Red Pepper Flakes and Roasted Onions! This is a dish that is sure to please your guests!


Looking forward to seeing all your concoctions in the microwave! Check out my post on MEC: Party Appetizers for more information.


Thursday, June 16, 2011

MAITRI Challenge Recipe: Chilled Cucumber Soup


Recently as part of the MAITRI friendship chain, the very sweet Swapna of  Simple Vegetarian Recipes sent me a much-anticipated parcel. Lo and behold! Swapna made my day with a very sweet card and a really cute gift… check it out!


Of course, the parcel also contained the mystery ingredient tangy Black Salt or Kala Namak. I had so much fun thinking up of recipes to concoct with the kala namak. So at the end of it all I give you this simple and absolutely refreshing chilled cucumber soup.

Swapna.. I'm so glad I was matched with you! Thank you for the lovely parcel. Priya and Reshmi, your efforts at thinking up of this delicious idea of a friendship chain and bringing it to life are much appreciated!

This recipe also goes out to my friend KK for his request on 5-minute healthy recipes… I hope you like this one!


What You Need:
1 Large Cucumber - diced and deseeded (or 2 Small Cucumbers)
2 Scallions / Green Onions / Spring Onions – Chopped
Juice of Half a Lemon or 1 Small Lemon
1 Garlic Clove – Smashed
2 Cups Yoghurt
1 Scant Teaspoon Black Salt/ Kala Namak
Salt to Taste
White Pepper to Taste

To Garnish:
Chopped Tomato, Mint, Freshly Roasted Cumin Powder

Getting Down to Business:
Blend all the ingredients till smooth. If desired you can strain the soup for a smoother consistency.

Let the soup chill in the refrigerator. This will also help the flavors settle.

Garnish with either chopped tomatoes or mint and roasted cumin powder.

Notes:
If you are feeling bold, throw in some green chili for heat. To take the heat factor down a notch, you could deseed the chili.

For a smoother, richer soup you could also add in cream or sour cream.

I used non-fat yoghurt to cut down the calories.

Monday, June 6, 2011

Microwave Cooking: Party Appetizers


Woohoo! I’m back after a long break and in true housewife style I’m back with a bang! This time round I am honored to host the long standing and ever popular MEC event started by Srivalli of Cooking 4 all seasons.

I admit that I am one of those clueless people who only uses the microwave to heat up food but hosting this event has changed things around. A visit to Srivalli’s blog will blow your mind on the feats that can be achieved with the humble microwave alone! Inspired by this challenge, I am happy to announce June 2011’s MEC challengeParty Appetizers (because its always a party at the housewife’s!). It makes perfect sense to use the quick cooking prowess of a microwave when you need to whip up something quick but delicious for guests, expected or otherwise. After all, lets face it … sometimes life takes all the help you can get!


What do you like to make for your guests? Dips, nibbles, munchies… whatever it is, this is your chance to share your microwave friendly recipes. You could make over an existing recipe or share an old favorite. Maybe it can be a spinach and cheese dip or a colorful tomato bruschetta, spongy dhokla or even cute as a button stuffed cherry tomatoes, totally terrific mini mushrooms stuffed with cheese.  Let your imagination run wild! 


To participate, all you need to do is send in your recipe and an accompanying picture. Here are the rules:

  • The appetizer can be vegetarian or non-vegetarian… we love ‘em all!
  • The entire cooking process must be in the microwave (no stove tops even for prep). You could use appliances like the food processor, etc to help you prep for the recipe.
  • Multiple recipes are welcome.
  • Recipes submitted to other events are also permitted.
  • Recipes from archives can be accepted ONLY if updated as current posts.
  • This event is open to bloggers and non-bloggers alike. So if you like to cook, please do participate in this event.
  • You can contact me or send in your entries to thedisplacedhousewife@yahoo.com
  • Please include the following information stating MEC: Party Appetizers in the subject line -Your name, the link to your post and photograph of your dish.

  • All entries need to reach me by the 30th of June 2011 (end of the month in case you were confused!)
  • If you are a blogger, don't forget to link back to my page and Srivalli's page on MEC in your blog post.
  • Last but not the least stop by Srivalli’s page to know more about this exciting event.


Foodies… Let’s turn on the heat!

Images from Kraft Foods and Taste of Home

Tuesday, June 29, 2010

Herb Pancakes with Avocado Butter


I’m always on the lookout for easy and new ideas to experiment with, every time I entertain. While the classic appetizers are great, they can get boring after a while. These pancakes make for an easy elegant appetizer for a small gathering of friends or family. With an unusual avocado butter that is smooth and rich, these are sure to please critics of all ages! Also depending on your mood and the occasion, they can be dressed up or dressed down….nonetheless they’ll be delicious and novel!

Every one needs a little Marilyn in their lives...

Herb Pancakes with Avocado Butter

What you need:

Pancakes:
½ cup plain flour
½ cup self-rising flour
1 egg, beaten
½ cup milk
20grams / ¾ ounces chopped mixed fresh herbs (I used basil and very little sage)
1 teaspoon cracked black pepper
Salt to taste

Avocado Butter:
½ ripe avocado
60 grams/2 ounces butter
1 tablespoon lemon or lime juice
½ teaspoon cracked black pepper
Salt to taste if using unsalted butter

Getting down to Business:

For the pancakes:
Sift the flours together and add in the remaining ingredients. Whisk the batter well till there are no lumps and it is smooth.
Heat a pan with some melted butter and drop a tablespoon of batter (you can vary the size of the pancake by using bigger or smaller ladles or teaspoons).
Cook until bubbles appear on top. Flip the pancake and cook until golden underneath.
Keep warm.

For the butter:
Combine all the ingredients until smooth.

To serve:
Spread the butter onto the warm pancakes and voila! You’re done!

Notes:
If you want to be very fancy, you could pipe the butter onto the pancakes before serving.
If you don’t want to use butter, you can use low fat cream cheese but reduce the amount to lemon juice as per taste.
If you’re out of self-rising flour, combine 1 cup of all-purpose flour/ maida with 1 ½ teaspoon of baking powder and ¼ teaspoon of salt.

I send these pancakes to the very sweet Priya’s fruit/veggie a month event…don’t forget to check it out!

Recipe adapted from The Essential Fingerfood Cookbook

Wednesday, June 2, 2010

The Lazy Girl’s Guide to Entertaining Series


Anyone who knows me will agree I'm incredibly lazy. Nonetheless I always strive to turn my er... weakness to a strength and make life easier. Now, I'll stop sounding like a self help book (not that I read them) and stop digressing...


I strongly believe that when you entertain, the celebration starts even before your guests arrive. The whole experience should be enjoyable and you need to enjoy even the process of getting ready for your guests. Like someone said, unless you’ve had a great time your party is not a success. So to give you a teensy tiny boost up to enjoying yourself and your guests, here are two easy recipes you can whip up in a jiffy next time you entertain.


Easy Pink Fizzy (or whatever else you want to call it…)


What you need:
Raspberry Limeade
Sprite or 7up
Lemon Slices
Mint Leaves

Getting down to business:
Mix equal parts of the limeade and Sprite just before serving. Add in the lemon slices and mint leaves. Serve immediately.

Note:
I usually mix the drink directly into my serving glasses as guests walk in. I add in half a glass of the limeade, top off with some sprite and garnish with the lemon and mint.


Roasted Corn and Peanut Salsa

What you need:
1 bottle readymade Salsa
1 to 2 ears of Corn
¼ cup roasted unsalted Peanuts
Cilantro to garnish

Getting down to business:
Grill or roast corn. Shuck the corn off the cob and keep aside. To the corn, mix in the salsa. Stir gently so as not to break up the corn. Add in the peanuts shortly before serving. Garnish with the cilantro if desired.

Note:
I like to add in a pinch of sugar or red pepper / chili flakes depending on the salsa to adjust it to my taste.


Friday, May 28, 2010

The Lazy Girl’s Guide to Samosas!


Remember that scene in almost every sub standard generic diasporic (yes, I like to make up my own words) Indian movie where the mother wails that her daughter doesn’t know how to make samosas?

Stop wailing mommy, and read on…

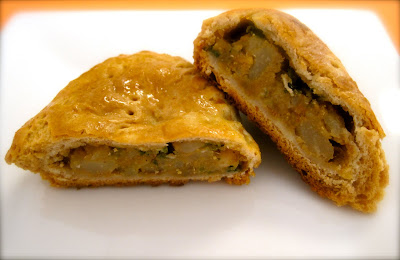
This is my updated version of the samosa. I feel life is too short to stand around frying up batches of samosas and then clean up! (unless someone else is doing the frying and cleaning for me…) This is a great recipe using a shortcut that you can make ahead and reheat in the oven for a few minutes before serving. I love the versatile filling that is quite different from the usual Punjabi samosa filling.


Urulai Somasi – South Indian Potato Samosa

What you need:

Readymade Refrigerated Biscuit dough – 1 can

Filling:
4 -5 Potatoes
1 tablespoons Fresh Coriander – chopped finely
8 – 10 Cashew Nuts - chopped
Salt to taste

Spice paste:
4 Dried Chilies
½ teaspoon Cinnamon Powder
1/2 teaspoon Cumin Seeds
¼ teaspoon Fennel Seeds
1 – 2 teaspoons Water

Glaze:
1 Egg
A couple of teaspoons of Water

Getting down to business:

Grind the spices together to form a smooth paste. If you do have the powdered versions of all these spices, you could use them to make the mix and avoid the grinding. Keep aside.

Boil the potatoes. Peel and mash coarsely. Add in the cashews, coriander, salt and spice paste. Mix well.

Pop open the biscuit can. Take each biscuit and roll out lightly. Separate each rolled out biscuit into two halves.  Place some filling in the center and wet the edges. Seal and crimp with a fork.  Alternatively, just roll out each biscuit and place some filling in the center. Fold into half moons and seal the edges as mentioned earlier.

Beat the egg with water.  Glaze the somasis with this mixture. Arrange the somasis on cookie sheets about two inches apart or as instructed on the package.

Bake as instructed on the package of the biscuit tin, till golden brown.

To Serve:
The somasis are great served with mint or coconut chutney or ketchup.

Notes:
I recommend piercing the somasis with a fork to let any steam escape and prevent them from opening during baking.
I suggest using Trader Joes Buttermilk Biscuits as they’re less sweeter than other brands.

Dough:
If you wish to use the traditional dough, here’s the recipe:

For the dough:
1 ½ cups All-Purpose Flour
½ teaspoon Salt
1 teaspoon Butter
Oil for frying
½ cup Water

Sift together the flour and salt. Add in the butter and mix with your fingertips till the look like crumbly breadcrumbs. Add water in gradually till you get a stiff dough.

Knead the dough till it’s smooth and pliable. Divide into 14 to 15 portions. Roll to a four-inch disc. Place a tablespoon of filling in the center. Seal edges with little water to form half moons. You can crimp the edges with a fork.

Heat oil till almost smoking. Lower heat to moderate and deep fry in batches turning frequently till golden crisp. Drain. Serve hot.

With lots of love,
The Housewife


Recipe courtesy my mom via an old Femina magazine

Thursday, May 27, 2010

The Ubiquitous South Indian Sundal


The ubiquitous south Indian sundal – made with peanuts, chickpeas, black-eyed beans, kidney beans.. you name it. For many, this will bring back memories of home. Sundal makes itself seen everywhere from beaches to temples and puja rooms in homes across South India. I made this dish for a recent tea I hosted (Gosh that sounds so fancy… but really, it was just us girls getting together!) and was great alternative to the usual fried goodie that makes its appearance with chai.

This also is a great source of nutrients and makes and easy quick snack if you use black chana/ garbanzo beans or any other high protein bean or lentil.

Next time you’re in madras, head to the beach, and look out for the vendors shouting out “ Thanga mangaaaa Soooondalll”!

This is my entry for the ongoing My Legume Love Affair 23 hosted by Susan of The Well-Seasoned Cook.  This marks the first entry from me to any foodie blog event! Yipee yay for that! 


Masala Chickpea Sundal


What you need:
Garbanzo Beans/ Chana – 1 ½ cans or 1 cup if using dried
2 Whole Red Chilies
1-½ tablespoons Oil
1/4 teaspoon Mustard
1 teaspoon Urad Dal
Salt to taste
Curry leaves – 6 to 7 leaves
Half a Lemon

Garnish:
Green Mango – chopped fine or grated on the large side of a box grater
Coriander Leaves – chop fine

Masala:
3 Green chilies
¼ inch Ginger
1 tablespoon Grated fresh Coconut

Getting down to business:
If you’re using dried garbanzo beans, soak the beans overnight and pressure cook till cooked. (I would do one whistle and then 10 minutes on medium low heat.) Once cooked, drain and keep aside.

Coarsely grind all the ingredients for the masala. Keep aside.

Heat oil and add in mustard. Once it starts spluttering, add in the urad dal. As the dal starts changing color follow with the curry leaves and red chilies. Don’t let the red chilies burn or turn black!

Next, add in the ground masala. Sauté for a minute.  Throw in the cooked chana and the salt. Stir for a minute or two. Remove from the fire and give the whole thing a squeeze of lemon.

To serve:
Transfer to a serving bowl an top with the mango and coriander leaves. This sundal tastes great at room temperature and doesn’t need to be served hot, so feel free to make ahead and relax!
If you would like to go really authentic, serve the sundal in newspaper cones just like at Marina beach in Madras, the motherland of all kinds of Sundal!

Lots of love
The Housewife


Recipe courtesy Mallika Badrinath

Tuesday, May 11, 2010

Zucchini Pancakes

In the series of ‘hot’ plates, have you seen my pretty butterfly plate?


Today I made Zucchini Pancakes after letting a couple of zucchinis sit on my fridge for too long. These make a very elegant appetizer or a quick snack and are a cinch to make!


Zucchini Pancakes

What you need:
2 medium Zucchini, grated
½ Carrot, grated
2 tablespoons Red Onion, grated
2 extra-large Eggs, lightly beaten
1 – 2 Green Chilies, minced (optional)
6 to 8 tablespoons All Purpose Flour
1 teaspoon Baking Powder
Salt to taste
Black Pepper to taste
Unsalted Butter and Vegetable Oil

Getting down to business:
Preheat the oven to 300 degrees Fahrenheit. Line a baking sheet with aluminum foil.
As soon as you grate the zucchini, do not let it sit. This would make it start watering.
Add in the onion, green chilies, carrots and eggs. Mix in the baking powder, salt and pepper. Be generous with the salt as this is something that needs to be seasoned well.
Then add in the flour. Keep adding the flour, as needed depending on the amount of water from the zucchini. You need to be able to spoon the batter onto the pan.
Heat a large pan over medium heat. Add in equal amounts of butter and oil together in the pan. When the oil and butter are hot (don’t let the butter burn or smoke), lower the heat to medium-low and drop heaping tablespoons of batter into the pan. Cook the pancakes about 2 minutes on each side, until golden and browned.

Place the pancakes on the prepared cookie sheet and keep warm in the oven. Wipe out the pan with a dry paper towel, add more butter and oil to the pan, and continue to fry the pancakes until all the batter is used. The pancakes can stay warm in the oven for up to 30 minutes. Serve hot.

To Serve:
These are best eaten warm and can be served with a tiny dollop of sour cream on top like latkes. To make it look even fancier, lightly sprinkle on some diced chives on the sour cream and voila! You have a dish worthy of the ‘fanciest’ party!

Notes:
This is not a batter you can mix ahead and store as the zucchini can sweat a lot and make it thin out. If you wish, you can mix in all ingredients except the zucchini and salt. Add those in at the end.
I know that Zucchinis may not always be available in India, but I do remember my mother in law telling me that Ridge Gourds make good substitute for Zucchini and vice versa. Just ensure you peel the gourd and check for any bitterness before cooking!

Modified from Ina Garten’s Zucchini Pancakes.

Friday, April 30, 2010

Perfectly Crunchy Baked Onion Rings


I love fried food! I love the crunch of a well made onion ring or the crisp exterior and softness of the perfect salty French fry. What I do NOT like is frying anything at home. It’s messy and too much of a process. I also like to try to eat healthy when I can. (Please note: I said ‘try’!) So every time I crave something sinful, I try to find a lighter easy-to-make option. That’s how I came across the baked onion ring. Now what kind of person would I be if I didn’t share a great recipe with you? Perfect for a BBQ, lazy Sunday snack or even a rainy day.

Start with a hot plate :)
  
Pile on some crunchy onion rings

Now admire your handiwork, pick up a ring, open your mouth and pop one right in!

Perfectly Crunchy Baked Onion Rings

What you need:
1 1/2 cups Baked potato chips
1/2 cups Breadcrumbs
1 large Egg
1 cup Buttermilk (low fat if available)
1/4 cup All Purpose Flour plus 3 tablespoons extra
1/2 teaspoon Cayenne Pepper/ Chili Powder
Salt
Freshly ground Black Pepper
1 - 2 medium sweet onions, such as a Vidalia
2 – 4 tablespoons Oil

Getting down to business:
Preheat oven to 450 degrees. Line two rimmed baking sheets with foil and pour the oil onto the sheets. Keep aside.
Peel and slice onions into 1/2-inch rounds and separate into rings, keeping only large, whole rings (reserve rest of the onions for other uses). You should come out with about 12 to 14 intact rings. Place the three tablespoons of flour in a re-sealable plastic bag, then add onions, and shake to coat. Keep aside.
In a food processor, pulse baked chips and breadcrumbs until fine crumbs form, then transfer to a flat dish. Add in some salt and chili powder or cayenne pepper. Combine and keep aside.
In another flat dish, whisk together egg, buttermilk, flour, and chili powder or cayenne pepper. Also add in the salt and black pepper.
Pop the baking sheets into the oven and let the oil heat up for a couple of minutes.
Now create an assembly line of the onion rings, egg mixture and breadcrumbs mixture. Dip onion rings in egg mixture (letting excess drip off) and dredge in cornflake mixture; place on a large plate.
Remove the sheets from oven and tilt to coat evenly with oil. Arrange the onion rings on sheet. The hot oil starts the cooking process. Try not to pile too many rings on each other. Aim to spread them out evenly across the sheets.
Bake about 8 minutes and then turn the rings over. Bake again for another 8 minutes or until golden brown. Season with salt as soon as you pull the rings out of the oven.
Serve hot.

To Serve:
These rings are great served hot from the oven with a Creamy Garlic Aioli or some Ranch on the side. If nothing else, good ole ketchup will work as well. Dip Dip Dip and voila!

Notes: 
If you don’t have access to baked chips, use cornflakes.
Use vegetable oil or any oil with a higher smoking point (sunflower, grape seed, etc). Avoid using olive oil.
I stored the leftover rings in the refrigerator and crisped them up in an oven when I needed them.
If you need more of the crumb coating, mix up the chips/ cornflakes and breadcrumbs in a ratio of 3:1. You could even do half cups and pulse them.
If you’re making your own buttermilk, then it needs to be slightly thick.
If you don’t have access to a sweet onion, try blanching a regular red onion in some boiling water for a minute to take the edge off the strong onion flavor.


Modified from Martha Stewart’s and Ellie Krieger’s Oven Fried Onion Rings.